Surviving Parents Evening(s) – Top 10 Tips

After 11 years I have mixed feelings about parents evening – sometimes I love them, sometimes I dread them. Parents evenings are not something which you train for, during your training year you will probably observe a parents evening and if you are lucky you may get to speak at one. I recommend if you get the opportunity in your training year, take the bull by the horns and get involved.

Here are my top tips for surviving parents evening.

  1. Formalities – Parents will be at times as nervous at meeting you as you are them. Their children will have told them all about your lessons (the good and bad). Parents will already have a picture of what you will be like from these conversations. First impressions count, I always stand and shake their hand, arrange an extra chair if extra siblings arrive and make them feel at ease straight away by introducing myself with my first name.
  2. What do they want to hear? – They want to know how their child is getting on and if they are making progress. Make sure you are fully prepared and write notes on the name sheets if needed, if it is not a student you know well.
  3. Who starts? – So there is not an awkward silence, if the young person has arrived as well, I start with them. I ask how they are getting on? Are they enjoying the subject? Do they have any concerns? Students tend to be braver with parents and carers with them and you quite often find out a lot of “hidden” information.
  4. Take it to the ‘rents! – Once the young person has had their say, I ask the parents if they have any specific questions. After this I sum up what I know about the child. There are 5 types of parents that arrive and sit in front of you.
    1. The I want to get out of here before the rush parent – they have no questions. In fact they know their child is going to get a glowing report, they are here because they feel they have to and to give their child a bit of a boost
    2. Let me just read the last report The parent has no questions but feels they should ask something and will get a copy of the last report to read. They will decide upon a question after reading it
    3. The prepared list in a notebook You know you have your hands full when this happens. A list of questions to test your knowledge on their child and what you have sent home in the form of reports.
    4. I have no Idea who you are This parent has often appeared solo without their child and keeps looking at their bit of paper to remind them of your name and what subject they teach. They will spend half the time asking questions about the teacher they are meant to see next.
    5. The teacher that wants to know about progress!! You always know when you have a teacher sat in front of you, they either tell you straight away , have there staff ID around their neck or ask about levels of progress or throw in other edu buzz words. It feels as if they are scouting out the school.
  1. Don’t bother with books – back in the day I used to bring the students books in to show parents work. Unless there is a very specific reason for this (good or bad) I would not bother. It does not really add to the conversation.
  2. Get an assessment done in time– Linked to the above really. I always like to make to make when possible to have some relevant and up to date assessment data I can talk about. This can help answer the question I get asked the most. “ what do they have to do better?” / “ how can they improve”. I always pass on a target either academic or personal. This shows you know the student and ultimately care.
  3. What can we do at home? Another question I am asked a lot – so I am now prepared for this question. I bring with me a print out of relevant revision websites (Seneca, bitesize) and log on details for the school on line text books. This always goes down a treat, and is a real winner in my eyes.
  4. What do they need to revise? Again a question I have heard a lot at Y11 / KS4+ parents evenings so I now bring with me a list of topics to hand to the parents and also retrieval practice questions (and answers) they can use to test their children.

10 strategies to involve parents in retrieval practice

9. Data, Data, Data – I have to hand a print out of my excel markbook which has information about homeworks and assessment scores. I makes for a good comparison and it is always interesting to see what students remember about their test scores and if they told parents and carers about them. If there has been a homework set over the parents evening period, I also try an bring a few extra sheets in as well to hand out as and when needed.

Using Plickers to assess for Mastery

10. Rubrics – If like my reports you give a qualitive grade for attitude to learning, I bring with me the rubric matrix for the criteria. IE what it means to be excellent, good, needs improvement etc.

Following these ten rules means I enjoy parents more and I hope parents feel their 5 minutes have been productive and not a waste of time. Of course parents evenings can be very frustrating, the parents that you really want to see, do not book in and you hear yourself repeating what you have written in the latest report. You get the parents that talk down to you and have a dig, but mostly 99% of the time the parents are really supportive and behind you.

If you are not leaving parents evening feeling it has been worth while, you really need to change something. Hopefully one of the ten ideas above will reenergise these evenings.

If you have any thoughts and ideas, I would love to hear them.

Check out these relevant blogs

How To Solve A Problem Like….Homework

Top Ten Tips To Train To Teach: advice for student and newly qualified teachers

The image was taken from this blog on a similar topic from teacherhead

https://teacherhead.com/2015/03/09/parents-evening-teacher-appreciation-night/

Mapping the Physics GCSE Curriculum

I have started to think more and more about the Physics I offer at GCSE and how they fit together. I believe the cynics amongst you may believe this because of the OFSTED triple I’s – it has certainly been a positive push to make me think about the order and reason we teach topics and how we can use ‘research’ to inform our teaching and curriculum ( retrieval, spaced practice and interleaving)

I have lots more work on this and there is lots of great blogs out their – this is an excellent blog to start with https://rosalindwalker.wordpress.com/2019/08/06/curriculum-and-cognitive-science/

I have created this Physics curriculum map to help me in my first steps.

It physics curriculum map 2

It can be downloaded on TES here https://www.tes.com/teaching-resource/physics-gcse-curriculum-map-aqa-12204332

Follow me on twitter

Why not read the following while you are here:

Assembly – Tackling Homophobic Language in schools.

14 Research Papers on Dual Coding

Get that job, interview success – a 3 minute quick read.

Managing Behaviour: The 5 step appeal

5 Step Appeal

As well as a teacher I volunteer as special constable. Every year I attend Officer Safety Training which includes refresher training on UDT, take downs, handcuffing, ASP, Pava. The latest training session also included a section on the 5 step appeal which can be summerised as stages to go through to get [violent] offenders to cooperate with you, to safety restrain them, arrest them, negotiate with them to make and others safe.

This training really got me to reflect on my own role at school with a focus on being a head of year and being “on call” as SLT. As head of year you encounter conflict every day, sometimes at the request of a classroom teacher. On these occasions the situation has often escalated to a scale, where it can be hard to get back to a level playing field.

The 5 step appeal is something which I can not only embed in my policing but also teaching. I will share how I think it can be used and hope others will find it a useful tool to have in the bag. The steps should not have to be always followed in a direct order. In fact, Step 4 is probably the most important to evidence compliance.


Step 1 – Simple  Approach

The most simple thing you can do is ask the student to stop their behavior.

“stop shouting”

“Get down from the table”

“Stop throwing the gluestick”

“Leave the classroom”


Step 2 – The Reasoned Appeal

Remind the student why they are not following your expectations and/or school rules.  Repeat why you are making the request and inform the student of their behavior and options.

“I have asked everyone to work in the groups set, not to walk around, return to your seat”

“The activity should be completed in silence so you and others can think”

“is this safe/ you are putting others in danger”


Step 3 – The Personal Appeal

Make that personal appeal. Try to make the student put themselves in another students shoes and make them reflect on their actions. How would they feel? Why do you want them to do it?

“How would you feel if you were working in silence and other students were distracting you”

“Would you behave like this if the head/folks at home were here?”

“If you do not stop doing………. then you will lose your lunch time”

“What will mum say when I have to phone home later to say this….”


Step 4 – The final practical appeal

The last chance saloon! Otherwise known as “what can I reasonably do” appeal. I have tried this a few times as head of year and it is a very good open question to get a conversation following and could ultimately lead to interventions.

Inform the student of what they have done, what they need to do and ask them “ is there anything I can reasonably do [or say] to make you …………………………………………”

Of course you may get silly requests but I would just repeat what you have asked. If anything it shows a emotional intelligence in recongising that it is possible the student is showing behavior for a reason and that it is some kind of (missed) communication.

Tell the student this is there last chance before it gets really serious. If they do not do what you say not you will have to take the following actions and there will be named consequences. At this stage you could offer alternative options.

Step 5 – Action

If you have given the student any options such as if you do A) this will happen, B) this happens and so on. I think it is important at this stage to act on what you have said the outcomes will be in steps 3 and 4. Do what you said you were going to do and do not make empty threats.  You will need make a judgement call on the conversation and evidence and follow through with consequences and actions.


Examples of how I have used the 5 step appeal to resolve more complex situations:

Context: Called on SLT radio that a student has walked from the room where they were meant to be.

Once located I asked the student to come back with me, they didn’t budge an inch. I then informed the student where they were meant to be and who they were meant to be with and then that they were missing vital learning time. The student did not move from their location and had no intention of leaving. I then asked “what can I reasonably do to get you back to where you should be” – the student responded to this and opened up. 2 minutes later they were back where they should be.

Context: Student refusing to go to a particular lesson.

I spoke to the student and asked them to attend the lesson. When they said they didn’t want to and would not. They were then informed that it was expected that all students attend timetabled lessons so they could learn and we know where they are and they are safe. I then focused on step 3 to make it personal – I asked what they wanted to do when they left school, to see if I could relate the subject to their career of choice. When these and other requests did not work, I asked “What can I reasonably do to get you back in this lesson?” once again the reasons why the student did not attend were expressed and they could be resolved.

The following video from Gwent Police shows police officers in a life or death situation using the 5 step appeal.

https://www.youtube.com/watch?v=W30sCkf9J2s

Let me know if you have found this useful


A more detail version can be read if you are a member of the Chartered College of Teaching

Top Ten Tips To Train To Teach: advice for student and newly qualified teachers

“It Is the most stressful year you will ever experience”
                                                                                                           Lots of trained teachers

Was it my most stressful year ever? No! No it wasn’t. Do not get me wrong it wasn’t easy however it should be enjoyable and should not stop you doing what you normally do.

My placement schools could not be further from each other. My first was a tough 11-19 city secondary and my second placement was a small independent school. Throughout my second placement my feedback was mostly ‘it was good’ however on reflection I didn’t want to hear that I wanted to know how to be better and how I could support my students better.

I secured my job for my NQT year and a year later I was the Science Departments ITT PGCE student mentor. I did this role for 9 years and only recently in the summer of 2019 stood down due to a promotion and how it impacts my workload. As I mentor I was not given extra time or any extra money – if you are a mentor, you do a cracking job.

Every student teacher required individual personalised support and feedback just like our students. I have found myself reflecting a lot on the responsibility and feel I could offer some generic tips for all student teachers and also NQT’s.

1. The first is nice and simple: Sign up to the best source of advice and free CPD out there – twitter. Lots of teachers give up their free time to offer support and resources. It really is a no-brainer.

2. I wish I knew about the tonnes of research out there. Maybe I was too naive but there was plenty more than the required course documents. The following might be a good start for you:

A to Z of Cognitive Science

20 ideas & strategies for Student Led Dual Coding

20 Ideas for student led retrieval practice

14 Research Papers on Dual Coding

10 Research Papers on Retrieval Practice.

3. Linked to number 2. – Embrace this research. Spend time reading what interests and what is relevant to you. Use this a discussion on twitter – number 1.

4. Write a blog – reflect. The blog doesn’t have to be read by anyone but you. You will most likely be asked to write a lesson/weekly reflection, this is more than that. This is your career and not a chance just to jump through hoops.

5. Take advantage of the CPD offered. Again maybe it was my naivety and/or just a chance to get out of school for a while but I did not take CPD seriously. I didn’t know how to, I didn’t why I had to. It took me years to see the importance of it all. As a new teacher, you have a lot  more chance of getting on courses that you request to your SLT.

6. Poster lessons are mostly a waste of time – spend the time asking quality questioning and challenging your students. In my early days as a teacher the LA (local authority) had subject advisors. The science advisor had a catchphrase which we laughed off but again it is only now I can see what they really meant when anyone suggested an activity or learning task they said. It sounds good – but “where it’s the learning?” Think about the tasks you offer to students. How and what are they going to learning. Knowledge is far more important than keeping the hardest classes quiet for an hour.

7. You will be expected to plan lessons especially as you start your career – take advice of how to do so effectively and efficiently. I remember taking hours to plan 1 lesson during my training year, only to change the lesson again and again and then go back to the original plan. I scoured the internet high and low for resources – taking the best bits from each to plan a lesson.  It was often  a mish mash which hardly made sense to me. Please don’t spend hours reinventing the wheel however make sure you at least make the lesson your own. I have seen many a student teacher come to stop in a lesson because they have no idea the meaning of the slide. Also please don’t take credit for resources if they are not yours – I once had a student teacher who planned a great practical lesson. The lesson I remember was much better than a previous one. They lost my trust when they said it was because of the investigating planning sheet they had created. Only they hadn’t – I had! They had just downloaded it from my TES account. If you are interested this is what they used:

https://www.tes.com/teaching-resource/science-investigation-writing-frame-6034723

8. Time management during these years is important. Teaching never ends. You can say you have nothing to do. There is also a lesson to plan or change, always a book that needs feedback and always a parent/carer you can ring. Be prepared to say ‘no’ and be honest about this. What you don’t want to do is make promises to your school, department, mentor and even worse the students only not to do it and you let them down.

9. Arrive organised – most student teachers contact schools before hand. Some want lots of information some of which is now impossible to give under GRDP data protection however if you are request and are given schemes of work etc. look through them. Print of the weekly and lesson observation sheets before lessons. It also goes without saying make sure your lesson resources are pre-printed. Asking the class to go and collect printed doesn’t look good – especially if you are also being observed by the university. Along these lines most schools have their important policies on the internet – safeguarding, teaching and learning and behaviour for learning. Read them – it is also a good idea to read these in preparation for job interviews.

10. Subject Knowledge – never think you know enough. Keep reading and learning.

Above all remind organised and focussed. Enjoy everyday –  and just ignore the moaners. Every profession has its complainers – those that have been around the block and think they know more. Stay away from these and stay positive.

Join me on twitter


A to Z of Cognitive Science

Using research and making use of evidence from cognitive science to inform education is now becoming a hotly debated topic on platforms such as twitter and more and more educational companies are using the ideas to support students. Educational companies such as   who are soon to hit million subscribers are a front runner in using these techniques and not forgetting the team at who post engaging videos, educational blog posts and enlightening strategies that teachers can use quickly.

I have compiled an A to Z to help those that a new to this research and of course those old hands who may need a refresher.

AAce That Test from the Learning Scientists. A team of brilliant cognitive psychological scientists who research the science of learning. Their blog posts are a must read for all teachers as well as parents/carers and students alike. They have a vision of sharing scientific research and making more accessible – they have certainly do that. I have been lucky enough to see them present at a teachmeet organised by the  in 2017 and they completely transformed my thinking around education. The team can also be found on twitter separately – they are all well worth following.

B – Blake Harvard – The Effortful Educator https://theeffortfuleducator.com/ . Blake is an American teacher however has some very useful blog posts on applying cognitive science to education. Blake can also be found on twitter here ]

C – Concrete ExamplesOne of the famous 6 strategies highlighted by as a method to help students to study effectively.  Concrete examples are used when we need to understand an abstract idea.


D- Dual Coding – using visuals and text simultaneously so the information is encoded into long term memory. I have further blogs on this topic:

and recommend you follow on twitter as the dual coding oracle.

E – Efrat Furst – Dr Furst does a fantastic job at communicating and promoting cognitive sciences to education. She teaches out of Harvard University and her research-informed strategies have transformed many a classroom. Follow Efrat on twitter

F- Flávia S Belham PhD– The chief scientist behind applying cognitive science to education. Sign up to Seneca as a teacher/student/parent HERE and follow Dr Belham on twitter

Seneca has a great cognitive science course for teachers that I very much recommend. My certificate for this is proudly on the wall of my classroom.

G – Google Scholar. There are lots of ideas in cognitive sciences and you will have your favourite techniques and strategies. Google scholar searches academia for research and if possible gives a link for a free PDF download. It is well worth exploring this. For example “retrieval practice classroom ” gives some excellent results.

H – Henry Roediger III – Professor Roediger researches aspects of human memory, how knowledge is retrieved and how this can be applied to enhance education. His work on the testing effect with Dr Jeffrey Karpicke has changed teaching for the better.

I – Interleaving – one of the 6 effective study strategies for students by the learning scientists. Interleaving is a method of revision that suggests you mix up topics during your revision schedule and is often combined with spaced practice. There has been lots of debate on best to interleave, Mark Enser does well to explain how to embed this into the curriculum planning as interweaving.

J – Journals – Keep education evidence informed by reading. Research schools do a great job of passing on snippets and research however I believe it is important for all teachers to read and improve, we expect students to do it after all. I currently subscribe/read two accessible journals that are written by teachers for teachers. One of which is IMPACT from The Chartered College of Teaching and the other is ResearchEd – I fully recommend them both.

K – Karpicke, Professor Jeffery Karpicke has researched and written extensively on retrieval based learning, metacognition and cognitive strategies. One of his most ground breaking papers was co authored with Phillip Grimaldi on retrieval based learning

Karpicke, J.D. and Grimaldi, P.J., 2012. Retrieval-based learning: A perspective for enhancing meaningful learning. Educational Psychology Review, 24(3), pp.401-418.

L – Long Term Memory – After we have encoded and consolidated information in the long term memory our ultimate aim would be to retrieve it.

M – Metacognition and Self Regulation  -a cost effective way of raising standards across your school. The Education Endowment Foundation have produced this guidance report to help support teachers in embedding metacognition. Lots of research is being done on metacognition and it is well worth thinking about how you can embed into your pedagogy.

N – Neuroscience – Neuroscience is the study of the brain and cognition is about acquiring knowledge and developing understanding.  There is a great blog here by   

  has a nice video here

O – Online Platforms –Seneca Learning has been developed using cognitive science and is a platform that many students across the country are enjoying and benefiting from. I have blogged about Seneca here.

Plickers is a brilliant and free quizzing tool in which you can collect in data from retrieval quizzes.

P – Pooja K. Agarwal – Dr Agarwal is an assistant professor at Berklee College of Music teaching psychological sciences. She is also the founder of retrievalpractice.org collaborating with Henry L .Roediger III. Pooja has a great insight into cognitive science and retrieval and can be found on twitter  and

Q – Questions / Elaboration –Elaboration is one of six strategies named by the learning scientists in order to help students to study effectively. Elaboration is adding detail to what you know by questioning yourself. Why has this happened? How has this happened?

R – Retrieval Practice – another of the 6 strategies named by the Learning Scientists.The testing effect has long been researched and the simple conclusion is the more  you self test and quiz the better you will do. This should be done over a period of time (see spaced practice) and is the opposite to cramming and just reading material. I have written further blogs on retrieval practice and ideas of how to implement strategies here.

S – Spaced Practice- another of the 6 strategies named by the Learning ScientistsThis is the opposite to cramming. I have created a few resources for my students to use.

Good flashcard revision will not only support spaced practice but also retrieval.


T- Teachers & Twitter – on the front applying and testing these strategies need to be in the A to Z. Twitter is full of educators that are passionate in the application of research informed learning, some of which are mentioned in this A to Z. Twitter really is the best CPD out there and if you want ideas to implement a strategy, twitter is a supportive environment for you to ask the questions. #cogscisci is a great place to start

U- Untested and Unproven theories  (Neuromyths and Neurononsense)Brain Gym/VAK learning styles/ left and right side of the brain misconceptions – you name them and education has  –Dan Willingham has a brilliant and is active on twitter. See here a collection of articles that Dan has written which really are a must read for any teacher.

V – Volume keep it low. There is lots of conversation at the minute around if student talk is productive. Should students work bu collaborating in groups? is this effective? This is another great blog by Mark Enser “what does learning sound like?” and others from noise” and The power of silence

W – Working memory – working memory is the short term memory that is utilised when we are manipulating data of some kind. Once finished with it is either forgotten or encoded to the long term memory.

X – X-Amples from Rosenshine Principles of Instruction. Another must read for all teachers nicely summed up by in this blog and the research article by Barak Rosenshine 

Y – Years – how long facts will stay in your long term memory if you apply the strategies (hopefully…well that is the idea anyway)

Z – Zest and Zig Zag– From the zest of discovery and knowledge many teachers are now changing direction – zig zagging – in how they approach teaching and learning and their application of cognitive science in lessons.

Happy to take further suggestions – find me on twitter here

20 ideas & strategies for Student Led Dual Coding

Dual Coding in very simple terms is combining visuals/graphics with text/verbals. What it is not is having complicated pictures with lots going on next to powerpoint text and detailed drawings next to every sentence. The idea behind Dual Coding is that will reduce any cognitive load rather than put more stress on the working memory. Dual Coding if completed well should enable the memory to encode easier and so you are able to retain information in your long term memory; this in turn can be recalled during retrieval. I have written a few short blogs on retrieval practice here:

Much of what I have understood from dual coding has come from and the following research papers:

Much of what dual coding is and can be makes sense. I have also thought while teaching that if students are writing notes while you are teaching they may miss content and lack understanding and  I do not let students write notes will watching videos unless we play it twice. I now try not to overload the working memory by putting ‘complicated diagrams/ on presentations next to text as it will divide attention and I do not fill slides with pointless images that are just there to engage the learner. What is important is that the images and visuals are accompanied with text that represents the image.

I have put the following together some ideas of how you could use dual coding in your classroom. Not all of these ideas may work in your setting and will I am sure be more suited to some groups of students than others.

  1. Mindmaps

Students often get carried away by mindmaps – either that or never set sail only to write and colour a lovely title. If they do produce a mindmap, more often than not it is information and cognitive overload and loses its purpose. Mindmaps need to be kept simple, so students in the long run are able to self quiz using them. Set students a challenge that all branches need to be a certain colour, they must include diagrams, pictures and sketches and give them a maximum word count.

2. Annotated Diagrams

In science we use lots of diagrams to help explain concepts, ideas and phenomenon. Most if not all diagrams need further labels – but do we as teachers think hard enough as hard enough about how we label as much as what we label.

To reduce cognitive load it is important that labels are labelled within the diagram rather than attached to lines pointing to the correct parts or with labels in a box next to it labelled with a, b, c etc. There is a nice blog here explaining this with a great example by

3. A to Z

I have created this resource which is free to download from TES which allows for great retrieval as well as dual coding. Students use the letters A to Z to write a keyword or term for the topic of choice and then the students are able to draw or sketch something that represent the keyword.

4.Pictionary

Students write their own or are given a list of keywords. The game can be played various ways students could draw it while other guess it, or one student shows to the word to a group but can not see it themselves. Other groups members then draw it and the student that has the word has to guess what it is. The teacher could also instruct students to draw various concepts on mini white boards as a starter.

5.Story Board

Allow students to create a story board to help explain concepts. Download my template for free here.

6. Comic Strip

Similar to the story board but allow students to create their own comic strips or add text to pre-drawn comics such as these

7.Make it visual

Adding a diagram or two difficult to grasp concepts. I made a resource to support the teaching of GCSE Energy – stores and pathways. Students find this concept difficult to grasp and so I decided on creating this.

8.Put data in tables

Recently I was writing an email to colleagues regarding data entry and half way through I re-read what I had written and found it confusing. It was then, I created a table to put the data in – It took less time, made much more sense but more importantly allowed the information to be encoded a lot quicker. This is one of the reasons why we create tables in science, how else would you be able to organise thousands of data points?

9. Venn Diagrams

Organise data in a visual way – makes learning and reviewing knowledge so much easier. Mitosis Vs Meosis, alkane Vs alkene to fusion to fission

venn

10. Timelines

Timelines are a brilliant strategy to organise dates and times that other wise would take a lot of working memory to manipulate. I have used timelines in science to visually represent the changes to the atomic model and the stages of the big band. History teachers I am sure are already all over this!

11. Infographics

I often create infographics by accident. I start off wanting to create a mind map but end up with an infographic. I see the infographic as a mindmap without the structure, but not lacking structure and information that it can be classed a poster.

infographic

12. Flashcards

I have blogged about the use of flashcards here:

and I suggest you spend 5 minutes reading this.

13. Double Bubble Thinking Maps

These are a great tool like the venn diagram if you are wanting to compare and contrast ideas. Unlike the venn digram which could be used for 2+ ideas, the double bubble would just be used to explore the similarities and differences between two things.

doublebubble

14. Fishbone Thinking Map

This type of analysis diagram is used when ideas can be quite complex and may cause conflict with one another. It can be seen as  more structured form of a mindmap.

15. Flow Diagrams

If you have lots of ideas that are a sequence of events a flow diagram is a useful way of getting your thoughts on paper in a visual format. I have most commonly used this when I have asked lower attainers to write a method for a scientific experience, they find a flow map easier to understand than just listing instructions.

16. Foldable / Interactive Notebooks

A few years ago I started to create interactive notebooks which I noticed were very popular other in America. The aim of these foldables were that would help support students in getting to grips with concepts and ideas. the resources are far more engaging than just drawing a 2D diagram in an exercise book. These resources can be found here:

17. Visual Methods /Integrated Instruction 

I have always tried before a practice to make sure I have shown students a clear demo, which is left complete and used as a reference point if possible. I will also put written instructions on the board which students can use. It was twitter that pointed me in the direction of his brilliant blog and chemix.org

Reducing cognitive load and adding dual coding to a method can only benefit students.

18. Sketchnoting

Sketchnoting is the art of adding graphics and visuals to notes instead of writing them all in words. The Naked Scientists have produced some great videos in the past using the art of sketch noting and it is explained very well in this article by 

19. Tree Maps tree

I have used tree maps in classification type activities and decision making activities. I have used examples of these in the past when teaching the rock cycle. Does the rock dissolve in acid – if yes go to A if no got B. They can be also used to classify categories such as the classic image of the kingdoms in biology.

20. Cycle Diagrams 

These are created as flow maps however the steps can feed back into each other. They can make complex ideas seem connected. Examples can be like these:

For further reading click here

http://www.learningscientists.org/blog/2017/2/5/weekly-digest-45

14 Research Papers on Dual Coding

Kate Jones has a brilliant overview and more links to dual coding which you can find here.

Any more ideas to add – let me know on Twitter.

OliCav has written this great book. Buy a copy here – click on the book image.

Image Google images: Commons; label for reuse but with thanks to &

10 strategies to involve parents in retrieval practice

In recent weeks I blogged about how as a teacher I have embedded retrieval practice into my everyday teaching and also how I have urged students to be independent in their own retrieval.

10 Research Papers on Retrieval Practice.

14 Research Papers on Dual Coding

20 Ideas for student led retrieval practice

10 ways to embed retrieval practice into your lessons!

This led on to me think how I could encourage parents to further support students learning. See here for 10 strategies to encourage parents to become more involved.

Provide Question and Answer banks.

Similar to what calls retrieval roulette however this is not classroom based but home based. I have put a series of questions and answers on the school VLE and made the pages to parents so they are able to self quiz students at home.

A question a day

I have provided 5 months worth of worth of questions (however not the answers) which parents and students are able to use. These have been handed out to students and parents in lessons and at parents evening, they are also available on the school VLE and TES.

AQA Physics

AQA Chemistry

A guest blog written by  explains it well Hexagon and Monthly Revision Strategies

Knowledge organisers & checklists

I have given students knowledge organisers and topic checklists and have asked parents/carers to involve discussions and questions around these points.

How do you solve a problem like….checklists

Sign up to Seneca

I have written an article for the school newsletter encouraging all students to sign up to Seneca and for parents to join them. Many parents have said to me in the past “Physics!, I have not done that since school, how can I help him/her” – well now they can.

Seneca Learning – classroom based Inquiry: The Questionnaire

Seneca Learning: The Start of the Journey…..

Accessible Past Papers

With the new 1-9 spec just started we are currently restricted with the amount of past papers however I have told students/parents where to find out papers such as here and here.

Log into Kerboodle 

I have made sure parents/carers are aware of their child’s log on for kerboodle and have encouraged parents to look around the site and support their son/daughter in using it.

Learning scientists blogs

I have given parents a link to the Learning Scientists blogs so they can better understand how to revise and offer effective support.

Encourage parents to design a timetable for students

I have create a revision timetable for AQA Physics however if parents and students can create one  together – even better. See my example here

Make and quiz each other using flashcards

It is becoming well known now that it isn’t the making of the flashcards that is important but the self quizzing using them. I have asked students to quiz parents as well as parents to quiz students.

See this Learning Scientists blog on how to use flashcards  

Self quiz from mindmaps

Once mindmaps are created parents and carers can help supports by quizzing them on them and allowing them recreate them from memory.

See this Retrieval Practice blog

If you have any other ideas let me know via

10 Research Papers on Retrieval Practice.

For those new or interested in Retrieval Practice in the classroom I have a list of 10 free research papers from journals that you can access [links are embedded in the reference – so just click away].

Before the links you may be interested to say how I have used Retrieval Practice in the classroom:

In no particular order:

Roediger III, H.L. and Butler, A.C., 2011. The critical role of retrieval practice in long-term retention. Trends in cognitive sciences, 15(1), pp.20-27. 

Karpicke, J.D. and Roediger III, H.L., 2007. Expanding retrieval practice promotes short-term retention, but equally spaced retrieval enhances long-term retention. Journal of Experimental Psychology: Learning, Memory, and Cognition, 33(4), p.704. 

Karpicke, J.D. and Blunt, J.R., 2011. Retrieval practice produces more learning than elaborative studying with concept mapping. Science, p.1199327.

Bjork, R.A., 1988. Retrieval practice and the maintenance of knowledge. Practical aspects of memory: Current research and issues, 1, pp.396-401.

Agarwal, P.K., Karpicke, J.D., Kang, S.H., Roediger III, H.L. and McDermott, K.B., 2008. Examining the testing effect with open‐and closed‐book tests. Applied Cognitive Psychology: The Official Journal of the Society for Applied Research in Memory and Cognition, 22(7), pp.861-876.

Roediger III, H.L., Agarwal, P.K., McDaniel, M.A. and McDermott, K.B., 2011. Test-enhanced learning in the classroom: long-term improvements from quizzing. Journal of Experimental Psychology: Applied, 17(4), p.382.

Karpicke, J.D., 2012. Retrieval-based learning: Active retrieval promotes meaningful learning. Current Directions in Psychological Science, 21(3), pp.157-163.

Karpicke, J.D. and Grimaldi, P.J., 2012. Retrieval-based learning: A perspective for enhancing meaningful learning. Educational Psychology Review, 24(3), pp.401-418.

Karpicke, J. D. (2017). Retrieval-based learning: A decade of progress. In J. T. Wixted (Ed.), Cognitive psychology of memory, Vol. 2 of Learning and memory: A comprehensive reference (J. H. Byrne, Series Ed.) (pp. 487-514). Oxford: Academic Press.

Agarwal, P.K., Bain, P.M. and Chamberlain, R.W., 2012. The value of applied research: Retrieval practice improves classroom learning and recommendations from a teacher, a principal, and a scientist. Educational Psychology Review, 24(3), pp.437-448.

And as an added extra a link to a presentation from Efrat Furst which she delivered at ResearchED in Haninge, Sweden, March 10th 2018.

If you have any more great papers you would like added, comment below or let me know on twitter


Mid Topic Retrieval Quizzes to aid metacognition

Retrieval Practice is a strategy I wish I embedded into my practice very early on in my teaching career. It has only been in last year or so, that I have embraced the technique and tried to implant it into my everday teaching.

I first read about retrieval from IMPACT, a journal I receive as a founding member of the Chartered College of Teaching. [Interim Issue, May 2017 & Issue 1, September 2017] . I have written further blogs on retrieval practice.

 I really caught the bug after I saw so many teachers sharing retrieval grids on twitter based on the design by Kate Jones   – see her blog about this here. 

I created my own grids and you can find examples here of ones I have upload to TES and free to download here. I even got students to create their own to self quiz each other – the template can be downloaded here.

The grids do take  time to create and it was a lightbulb moment when I saw Adam Boxer was collating what he called ‘retrieval roulette’ activities. If you have not come across this as yet, I fully recommend that you take 5 minutes to explore this page on his blog. 

It has become ingrained for students to enter my lab, turn to the back of their books (BoB) and complete theebbinghaus-diagram 6 questions for a low stakes assessment. If they do not know the answer – I now get them to write the question out as well. This example of routine self quizzing is a win win starter and is linked to the “Forgetting Curve” which was first described by Hermann Ebbinghaus. Ebbinghaus explains that information is lost over time and in order to “recall” this information we must first “retrieve” it. He also suggested that if you have forgotten something and then retrieve it, it will stay in your memory for longer. I use this idea, and idea of retrieval practice which is explained very well with downloadable materials by . Why Retrieval works by   is also a recommended  read.

Step forward a few months. Our CPD across my school for this academic year is based on applying ‘metacognition.’ While I reflected about how I use and can better embed metacognition in my own lessons, the more I saw the links between retrieval and metacognition. I did not want students just to experience teacher led retrieval but know which strategies work best for them and support their learning. Karpicke (2009) shows that students do not retrieve often or early enough, so I wanted to make sure students were self-reflecting at every learning opportunity.

I have used plickers in the past to assess progress (  Using Plickers to assess for Mastery ) however for this I wanted something more substantial in their books. I wanted it to cover retrieval, metacognition and teacher feedback to aid my workload and to inform my future planning. I decided upon a mini quiz half way through a topic and trailed it with a year 9 triple science class. The topic in question was from AQA Physics  “the Particle Model of Matter.” I created a 20 question quiz that I uploaded to TES for you to download. If I was lazy I could that used the questions I use at the start of lessons however I wanted fresh questions. We then self marked these questions and I allowed time for student reflection.

What has gone well?

Where are my knowledge gaps?

Why have I got knowledge gaps?

Am I able any strategies I have used to content I have remember to content I don’t remember?

How else am I able to learn?

This ticked the boxes in my own 3 step success criteria:

Retrieval Practice

1)      Students had a ‘surprise’ quiz with no access to books

2)      Questions were just from the topic we were studying some of which had been taught by a student teacher. (5 from Kinetic Theory, Specific Latent Heat, Specific Heat Capacity and Density)

3)      Questions were self assessed

4)      I decided to record the score when I gave written feedback

Metacognition

5)      Chance to reflect on what is going well so far in the unit of work

6)      Identify knowledge gaps

7)      Link knowledge with their topic checklists. See how I use checklists with my classes here.

8)      Give the students chance to reflect on how they have learnt

9)      Aid reflection on how to transfer useful skills and strategies

Assessment

10)   I have printed this out on yellow paper (school policy)  so they are the building blocks of any written feedback I give to students.

The feedback I have written as been quick and to the point so will hopefully allow for more learning. The weaker areas of the topics will be explored in more detail in future lessons as retrieval based starters such as these 20 starter activities to stretch & challenge students

I gave out to students as a surprise ‘test’ or ‘quiz’ as I called it as I thought it would really see the impact of retrieval. I have not told students yet, but I plan to issue the same quiz out again after term to see the effects. (More on this later). I may also complete further mid topic retrieval quizzes after I have instructed students to complete various topics on Seneca Learning to see if that makes a difference as well. There are lots of different pathways where this could go, I am sure I will blog the results in the future.

retreival mid termretrieval practice mid term

Karpicke, J.D (2009) Metacognition Control and Strategy Selection: Deciding to Practice Retrieval During Learning. Journal of experimental Psychology. 138(4)469-486.

Follow me on Twitter for future updates:

Seneca Learning – classroom based Inquiry: The Questionnaire

As a Seneca Pioneer School, [read about the start of the journey here] I decided to roll out a questionnaire to all my classes that I have used Seneca Learning with. Some groups where just introduced to it, others had used it in the previous academic year. I contacted Seneca to see if they would like any particular questions asked. I intended to use the results inform my day to day practice, send some ‘usage’ data to Seneca and to lead some staff CPD next year.

The questionnaire and sheet I used to tally up the results can be download from TES here:

The Groups I test were:

9.4 – A foundation level group that have just started their GCSE Physics course with me.

9T1 – A higher ability group that are mostly higher prior attainers and have chosen triple science as a curriculum option

10.5 – A small group of learners who find science very difficult. They will sit AQA Trilogy.

10.3 – A larger less able/mixed ability group taking AQA Trilogy. I am new to teaching this group this year.

10T1 – A higher ability triple science group. I have taught this group since the beginning of Y9.

11T2 – a mixed ability triple science class. I have taught this group from the start of Y9.

11T1 – a higher ability triple science class.  I have taught this group from the start of Y9.

In total 153 students took part in the survey from years 9 to 11.

Question 1:

How easy was it to sign up to Seneca Learning?

senecaq1

98% of students found signing up to Seneca Learning easy or very easy. It was interesting to see that younger found the process more ‘difficult’. It was also noted that some of those students that did find it easy were absent when I went the process.

Question 2:

How easy have you found it to navigate through Seneca Learning?

senecaq2

92% of students found Seneca Learning very easy or easy to Navigate. In total only 1 student (from the Y10 cohort) from Seneca learning ‘very hard’ to log on to.

Question 3:

In General, how have you found Seneca?

senecaq3

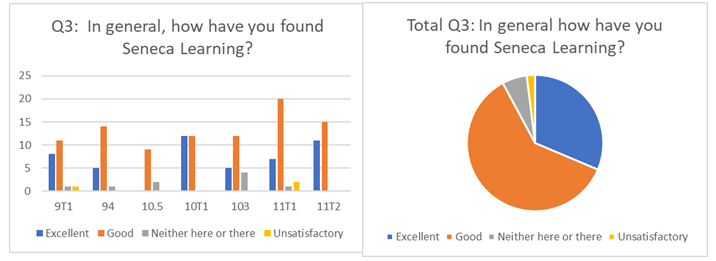
These results show clearly that students enjoy Seneca Learning. With higher triple groups finding the platform better than other groups.

Question 4:

Is Seneca an engaging and productive way to learn?

senecaq4

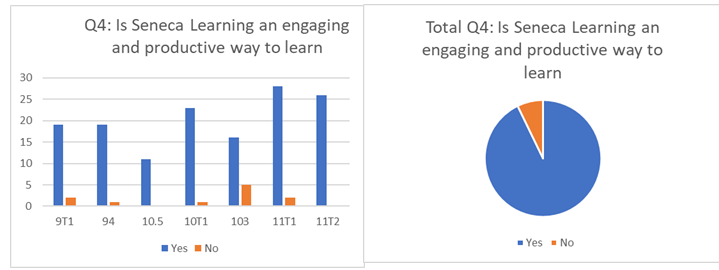
93% of all students who took part in the questionnaire found Seneca engaging and a productive use of their time. The 7% who did not feel it was a useful tool were mostly from the more foundation sets. This could be because of the student not understanding the context and the language used in the units. The group that had the most ‘No’ answers was 10.3 (5 students out of 21) – this group had only just been introduced to the resource so it would be interesting to repeat the questionnaire at the end of year to see if this has changed.

Question 5:

Has Seneca helped you learn?

senecaq5

Again a really positive outcome for Seneca Learning with 85% of students find Seneca helps them learn (56% some, 29% Lots)

Question 6:

Have you noticed you make more progress when you use Seneca?

senecaq6

Only 7% of students said they do not make any more progress than they normally would when the use Seneca Learning (this was only 10 students out of 153). 16% make lots more progress, 56% make some progress and 22% of students make a little more progress.

5 out of the 10 students who mentioned they do not make any progress were from my foundation year class, who had only just been introduced to Seneca. In 3 of the 7 classes questions every single student noted they make at least a little progress.

Question 7:

Does Seneca help you help the course content? And how?

senecaq7

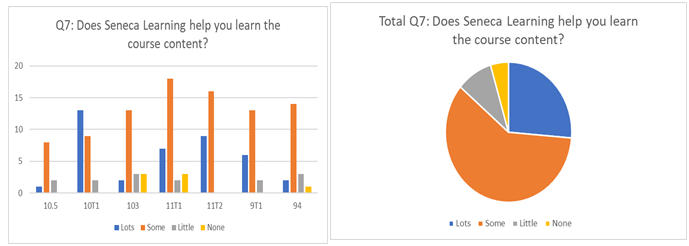
Only 5% of students claimed that Seneca Learning does not help them learn at all. 26% believe Seneca helps them lots, 60% believe Seneca helps them sometimes and 9% claim it helps them a little bit.

Once again 3 of the 7 students who claimed Seneca does not help them at all were from the foundation year 10 group. 3 students from 11T1 also made this claim, possibly because of the reasons given in question 14.

These were the reasons students gave as to why Seneca was useful for them.

“Mostly easy to read”

“Interactive”

“Gives you the answer & corrects mistakes”

“You can go back over the questions”

“Good for revision”

“The repetition of the questions is useful”

“You have to read the questions to answer the question”

“Lots of extra facts and information”

“Key information is explained well and it is fun”

“Helps me retain information”

“Different types of questions”

“Helps me remember as it explains things in a different way”

“I’ve learnt lots just by using Seneca”

“Seneca keeps my focus”

“Helps with my understanding so I wont make the same mistake again”

“I remember the pictures and diagrams”

“Engaging and a fun way to learn”

“Covers all the course content and questions ensure you through it thoroughly”

“Teaches you step by step”

“Helps me remember info to store in my head as it is all in my head”

“Highlights my weaknesses”

Question 8:

Compared to other revision / Learning Resources how does Seneca compare?

senecaq8

Compared to other revision sources it is clear Seneca Learning is preferred by many students. 63% of students asked believe Seneca is better than anything else they have used. 32% believe the resource is parallel to other sources. 5% of students have used better sources of revision for them. This is surely expected as one program or type of revision will not suit everyone.

This questionnaire was completed before Seneca Learning introduced the ‘classes and assignments’ section and teachers were able to set and push out assignments to teachers.

Question 9:

When have you used Seneca Learning?

senecaq9

Students had the option to answer more than once on this question or not at all. As an over view it is clear to see the ‘T’ (triple) groups used Seneca Learning far more in their own time at school and at home compared the less able groups.

In total 25% of the students asked said they have used Seneca Learning in their own time at school and 48% claimed they use Seneca Learning In their own time at home.  It is unsure at this time whether or not students who said they use Seneca in their time, may have been asked to use Seneca Learning for home learning.

Question 10:

If you log into Seneca Learning in your own time, how long do you spend using it?

senecaq10

This was an interesting question.  Only students that used Seneca in their own time had to answer it. 45% of students used Seneca Learning for under an hour in their own time. 27% used it between 1 to 3 hours (41 students), 3% (5 students) used it for 3-5 hours, 4 students used it for 5 to 10 hours and 1 student 10 hours plus.

On reflection this was not a great question, as I did not make it clear if this over the course of one day, one week or the total usage. Even so, once again it is clear that the higher attaining students from

Question 11:

Which platforms do you use to log into Seneca?

senecaq11

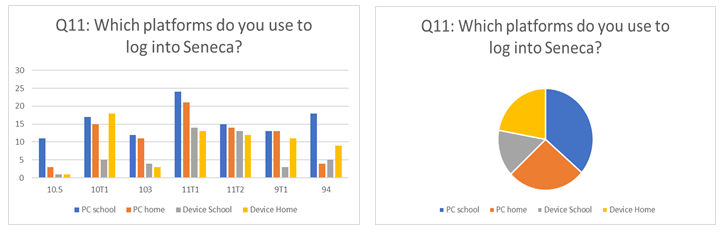
Students could answer multiply choices on these questions – in fact some answered all four. The device used most to access Seneca was using a PC/Laptop. Students did comment saying they may use tablets/Ipads and mobile devices more in there was an app available. Students were more likely to use a device at home but a PC in school.

Question 12:

Which subjects do you revise with the most on Seneca? (is your teacher aware?)

I believe I was the first member of staff at my school to introduce Seneca to the students. Feedback I received from this question shows that most students are using Seneca at various times across the curriculum to revise and learn in most subject areas, most teachers were not aware of this.

Question 13:

What is your favourite feature/aspect of Seneca?

There were many positive comments, that demonstrate the impact that Seneca has on student achievement. The most common comments include how easy and fun Seneca is, along with the use of the audio and visual elements that are embedded within the courses.

Here are some of the comments made by students in each class:

93

“Good mix of easy/hard questions”

“Good that you can see your mistakes”

“The videos are useful”

“Like that you can see your progress”

“The knowledge score and leaderboard”

9T1

“Easy to learn with”

“content is well explained”

“Easy to navigate”

“I like the world memory”

“The toggle questions”

“You can join your class”

“simple to use”

“Visuals are good as are the tests/questions”

10.5

“I like competing against friends”

“Audio and visuals are good”

“lots of subjects and courses”

“makes learning fun”

10.3

“useful facts”

“I like the memory palace”

“Lots of different types of questions”

“Shows how much you have done”

“layout is easy to use”

10T1

“Good variety of questions and courses available”

“I like the images, GIFS and videos”

“Ease of navigation – laid out clearly & simple to use”

“Progress score”

It is good when questions are repeated”

“Like the multiply choice questions”

“Memory storage”

“Competition between peers”

“I like the fact you can redo courses until you get 100%”

11T2

“Types of questions”

“Gifs and Videos”

“you need to get it right before you move on and can repeat”

“Interactive memories and knowledge score”

“Builds knowledge up”

“Wide range of subjects and questions”

“Interactive and rewarding”

“Clear and engaging”

11T1

“Repeat the questions if you get them wrong”

“Good to see the blue circle fill up”

“Memories and the knowledge score”

“Interactive, quick and easy”

Question 14:

How could Seneca Learning be improved?

The students really thought long and hard about this question. I was very impressed with the fact, many students really wanted to propose sensible suggestions. Some of most common themes from the higher tier students were:

  • Increasing the difficulty of the some of the questions
  • Longer exam style questions
  • More difficult to get questions correct (no autofill) + and at times the answer need is very random
  • Past paper type activities and questions

Foundation Tier students found:

  • Sometimes the language was too advanced – could some kind of dictionary be included or key word list with definition.
  • Extra quizzes
  • Learning Games included

9.3

“Some questions are too hard”

“more tips to help remember staff – like jokes and songs”

“The questions that you toggle are too easy because they are coloured”

9T1

More detail as to what you have got wrong”

“A warning box that pops up in case you press continue by accident”

“make your own nickname”

“more questions on topics”

“more choices for storage/memory palace”

“Even if I get all questions correct, I don’t get 100%”

“Some of the language is a difficult to understand sometimes – so explanation on key language of a link to a dictionary”

“I would like to see virtual rewards”

“Clear timers”

“More information and detail if you fail a question”

10.5

“Write your own name/nickname”

“Create avatars for yourself”

“Download the app in the app store”

“I want to see learning games and activities”

10.3

“Easier to find things”

“Make it more fun and interactive – like include games”

“Add extra video links”

“More fun quizzes”

“Add more vocational courses like Agriculture”

10T1

“Timed questions”

“Include harder exam style questions”

“Exam style exam papers”

“More quizzes”

“Choice of harder/easier questions”

“longer lessons dedicated to harder subjects”

11T2

“Higher / Foundation tier toggle option”

“Extra links for help and support”

“Different types of questions”

“Too easy to cheat!”

“Increase level of difficulty”

“Exam style questions”

“Past paper questions”

11T1

“Higher tier needs less autocorrect – you get the answer right sometimes when it should be wrong”

“More detail”

“Answers to fill in can be very random at times”

“More questions with a higher level of challenge”

“Extra style questions – with less multiply choice – more 4/6 mark questions”

“Individual class leader boards that are visible to the whole class”

Next Steps

The answers to this questionnaire has informed me that Seneca is a positive learning tool to have in the classroom. Hopefully results will see an improvement in student attainment. I personally will be using it more to set further home learning.

I will also be feeding some this to the whole school during an INSET later this term.

Top 10 Teacher Time-Saving Hacks

This blog has been on my mind for about a year now. What are the best simple teacher time-savers? These are little ideas which I have embedded in my practice over the past few years. They all save me some valuable time. I hope they might save you a few minutes as well – remember every second counts.

I have either come up the ideas myself or heard the idea elsewhere so I can not take credit for them all. I will try to justify how and why they have saved me time and I hope like every good #teachmeet you are able to take one strategy away with you.

1.       Number Student Exercise Books:

A simple idea, that I started to do in preparation for (idea 2). I export a class list from SIMS and number the students 1 to 33 (or generate a class list from Plickers and project this as this has numbers as well). Students then put this number on the top left hand corner of their books.

This saves time as I am able to (or selected lucky students can) quickly order the books, so I can see which numbers and so students are missing. Before this, I spent ages checking the register to work out who didn’t quite understand the instruction of “Please leave your books on the desk!” by the time I realised it was Joe Bloggs, they were long gone.

These numbers can also be put on home learning, so again you can quickly order the work and see who has handed in what has been asked.

2.       Using Plickers for Low Stakes Assessment:

I have blogged and raved about Plickers many a time. One successful blog is how I have used Plickers to assess for mastery.  https://sciencetltoolkit.wordpress.com/2017/01/25/using-plickers-to-assess-for-mastery/

Low Stakes assessment as retrieval practice and quizzing is an area Barak Rosenshine promoted in his “Principles of instruction” https://www.aft.org/sites/default/files/periodicals/Rosenshine.pdf

Plickers is very quick and easy to set up and is a great AfL tool to assess students, monitor progress and inform future planning. Once you get the hang of it, it is simple to quiz students. I use it most lessons to recap previous knowledge but every couple of weeks I create a longer quiz, in which I take in the marks.

The time saving aspect of Plickers is that it saves your questions, it is self marking and exports results straight to Excel. You can see which questions stumped the most students to inform future planning and which students didn’t quite perform as per expectations, so you are able to offer a little encouragement. It is very quick and easy to copy and paste in excel, and I do so in to my Excel Spread, which brings me on to time saver 3.

3.       Excel Marksheets

I have marksheet for each of my classes. These contain baseline data from SIMS, to help with seating plans etc. But I also record the day to day goings on. Stuff you think about but forget by the time it comes to report writing and parents evening (time saver 4). It only takes a moment to jot it down. I also record student absence, if they have forgotten their books and lack of equipment. These are updated and added to each term.  The spread sheet is where I record home learning marks & efforts (time saver 5) and scores from Plickers as well as summative end of unit test scores.

excel spreadsheet

I have taught my current Y11 since Y9 – Looking back, it is brilliant to see how some students have progressed along with trends and patterns.

I print a copy out and have it in front of me at parents evening. Talking of which….

4.       Parents Evening

Parents evening as much as they are dreaded by some teachers because it adds another 4/5 hours on to their working day are very important. They are important for parents to meet their children’s teacher, who they are trusting to support their children to get brilliant results and significant for teachers to meet the parents!

I found in my first few years teaching, I repeated myself at parents evening. This frustrated me, as I felt I wasn’t doing students, parents or myself justice. So I now offer up a more detailed analysis of students performance, attitude and attainment using the excel marksheet (time saver 3). This gives evidence to parents and students, suggesting I am not just making it all up.

parents evening

One question I get a lot, so I assume this is a common theme across is “ what can I do to help xxxx” and “what else can they do…” I now produce a simple parent take away slip which logon details for software the department has purchased for students, useful websites and tips. I have now to log on to Kerboodle, Seneca learning and links to exam board specification. Feedback from parents is very positive. This saves you time, as once it is done it is done and printed. It can be edited. It also saves your voice, on an evening when your voice needs to be conserved.

5.       Peer or Self-Marking Home Learning

Home Learning or Home Work is the vain of many a teachers life. I am a believer that any work a student does at home should consolidate learning and not be a filler. I hate seeing students doing a title page or word search because school policy states home learning needs to be set every week.

Home learning could add a considerable amount of time to marking workload. In the past, early in my career I may have done this. I apologise if this was the case. I now make sure every task I set to be completed at home, is relevant, useful and promotes learning.

I use exampro to download past paper questions from AQA and edit them. The questions can then be self or peer marked. Students put their number (time saver tip 1) and adding to marksheets (time saver tip 3). No teacher marking, but when you go through the questions you can give detailed feedback on how to answer questions and those extra snippets of knowledge.

The home learning isn’t always on the topic in hand either. Why not try to set homework from a topic from the previous topic or even year.

6.       Retrieval practice

 Creating a selection of questions that can be used a low staked starter. These are time savers, as questions can be saved for topics and can be repeated at any time. Remember to mix up the questions – they don’t just need to be on the topic in hand. See The Learning Scientists for the latest educational research on this.

Here is a previous blog I wrote on embedding retrieval practice into every day lessons: https://sciencetltoolkit.wordpress.com/2018/05/23/10-ways-to-embed-retrieval-practice-into-your-lessons/

7.       Live Feedback

Live feedback should not be live marking……….marking for the stake of it……. or…….. marking because school policy states it should be done!

I am a believer in live feedback during lessons because not only does it save you time but also it saves the students time. Rosenshine states that the more mistakes a student makes the harder it is to reteach it. So why allow students to make the mistake in the first place.

Once again, I hold my hand up to this. In the past I have seen a student draw a graph and not put units on an axis label. I have thought, great, I can now highlight this and prove to the powers that be that I am offering great productive feedback. Now, I tell students, as I check and monitor work what they need to do to improve. I am not writing anything in books, I may get students to jot down a self-assessment note, to what they have to do to improve, but this is purely for them, not for “the powers”.

Don’t allow students to make mistakes, this will save you time reteaching in the long run. This is another nudge to read Rosenshine.

8.       Feedback and D.I.R.T

How many times do you write the same comment in students books? Do this…do that…think about this! This wastes time, why not get students to write it?

I jot notes down as I go through students books. Write down students of praise and of concern who made need intervention. I use these notes to inform future planning – for instance if there was a message or comment I would have written in most students books I would make sure I address those issues the next lesson. This is a great opportunity to promote the use of DIRT (Dedicated Improvement and Reflection Time) to get students to improve their work.

9.       Student Reflection and metacognition

Linked to live marking (time saver 7) I use this when I have taught sections of work and want some feedback on how students have found it. I have just used this, [today in fact] after teaching alpha and beta nuclear decay equations. After modelling and teaching, I have lots of examples for students to complete on the board. I then went through these and students self assessed their answers. I then asked students to write a brief sentence or two describing the method of how they solved the problems and explain how they felt about the process. This included, how confident they were of their learning processes. You can read more on Metacognition here:

http://www.sec-ed.co.uk/best-practice/in-the-classroom-metacognition-explained

10.       Checklists – referenced through work to aid revision

At the start of every topic I hand out a checklist and knowledge organiser to all students. The organisers contain key words and definitions, timelines and visuals such as annotated diagrams and practical equipment. I have uploaded these to TES and they are free to download.

checklist

My checklists have been written in student speak from the exam specifications. I have given each ‘can do’ statement a code. Students use these codes to reference their work as they go through their books. Sometimes I tell students……today we are focussing on F11 sometimes they have to work it out themselves. Students find this a great help in organising their work. Students can tick as they go along, this is also a great visual overview for students who haven’t attended lessons for a while, they can see what they have missed and what they need to do to catch up.

11.       Edu-Twitter

A bonus if you are not already on twitter do it. There are ideas shared a plenty evert day. To those that share, thank you.

Let me know your top teacher time saving tips. 


Promoting science in primary to secondary transition

A little over a year ago my secondary school signed a partnership with all local primary feeders. A charter was signed [this was not to become a MAT] but with the objective:

Our joint vision is to provide the best possible and most rewarding education for all children and young people in the collaboration as they progress through our schools. This will improve their life chances by delivering improved results (academic and non-academic), offer broader horizons to all and enable them to make sustainable life choices.

Schools will maintain their individual ethos, identity, vision and values as a commitment to meeting the diverse needs of our children and young people and their families.

This charter underpins the working practices of each and every member of our schools. It is not intended to be prescriptive of individual practice in our schools.

This has led joint INSETs and meetings. I have been working closely with our primary science colleagues with the overall aim of improving student outcomes at both primary and secondary by collaboration.

At secondary level, science is always the ‘unofficial’ core subject and English and Maths always seem to take priority. The importance of science across the curriculum is often undervalued. Students know they need ‘English and Maths’ to get into college and post-16 ventures however science always seems to play second nay third fiddle.

Many primary schools have devalued science as well, mainly due a lack of specialist teachers and no science Y6 ‘SATS’ exam only teacher assessment. Some primary schools have reportedly been quoted in saying they do not do any science in Y6 as SATS is their main priority – and students are often coached through the papers . This means students studying in year 7 have large gaps and ‘target grades’ are over inflated and it is of course secondary schools that have to pick up the flack here.

So over the past year this is what I have been involved with in terms of a primary and secondary partnership:

Opening communication between all primary lead science teachers. After this it was important to agree on a shared vision and identify areas of development.

Leading workshops on KS1 to KS4 science: Primary colleagues came to our science department. Prior communication highlight ‘investigations’ as area that could be improved. I went through each unit that just be taught at KS1 and then how it is built upon to GCSE. Each primary unit was discussed in more detail and ideas were shared between colleagues on what ‘SC1 / How Science Works / Thinking Scientifically’ investigations could be completed.

A major restriction for science in our feeders was not just lack of specialism and time (the science lead teachers do not have a TLR for the role, so they are not paid nor do they have allotted time) but also lack of equipment available to them. It was agreed that we would share as much equipment as possible and in future INSETs and Twilights, secondary colleagues would train primary colleagues in how to use them.

Future action points which will be prioritised over 2018-2019

Students working together – get more secondary students working in the primaries, and primary science students working together from different schools.

Standardisation testing – develop an assessment for Y6 to post SATs but marked by secondary. This is planned to be an interactive test using equipment IE putting 50cm3 of water in a small beaker and large and asking which has more water or showing a ruler which is larger 20mm or 4 cm.

Issues and problems encountered

All of this is difficult as there is no extra time for this and so requires the lead science teachers from the other schools to attend after school meetings – this proves problematic.

Quality assurance once projects have been embedded is hard – with no time for sharing and CPD. Many of the joint twilight meetings are not subject specific
I will be writing more about this journey as and when.

Pitching ‘challenge’ in your lessons to ‘stretch’ all students

Is there enough challenge in your lessons? Can you stretch your students more?

After reading a conversation between and regarding pitching your lesson to incorporate the right level of challenge for your students (high or low ability). Here are some snippets:

I had recently been thinking a lot about challenge and stretching all students and had just posted a blog on ideas for starter activities to do this and get the students in the right frame of mind to start their lesson. This can be found here:

https://sciencetltoolkit.wordpress.com/2018/03/08/20-starter-activities-to-stretch-challenge-students/

I decided to modify the idea by James Skinner so it could be used by all year groups and ability ranges. I would then use the data to inform my future lesson planning.The template of the design can be downloaded on TES:

https://www.tes.com/teaching-resource/stretch-and-challenge-graph-getting-the-level-of-challenge-right-11855189?theme=0

Analysis of my trial group:

Period 1: 9.3.18 – Y9 Triple science (AQA Physics) – parallelogram of vectors and resolving vectors

I decided to trial the use of the #challengegraph in my year 9 triple science set 2 group. There are 26 students in the class and it is mixed ability, however slightly more higher ability than lower. Resolving vectors is a higher tier only skill but I wanted everyone to try it as it would only reinforce skills learnt in the previous couple of lessons.

I told students my expectations of the graph – that it is their personal lesson learning journey and the idea of ‘some challenge’ is to get them thinking, ‘lots of challenge’ is really hard and they are struggling. Ideally the graphs, if the lesson is pitched correctly should be around the ‘some challenge.’ I was well aware the graphs will and should fluctuate depending on the lesson and the timing. I also told students that I wanted this anonymous however students could write their name on the reverse. This would be interesting to pin point the achievement of your higher prior attainers but it is of course a possibility that with their names on it students may not be as honest.

[0-20 minutes] The lesson starter by going over some home learning on drawing and measuring vectors either at right angles or using a compass to draw a parallelogram. The majority of students  found this had some challenge attached and this was apparent when I collected the scores in after the work was peer marked. I then gave students 5/10 minutes to correct and improve their work until everyone understood their mistakes.

[20-30] I then introduced how to resolve vectors and go through examples linking as much as I can to previous lessons and clarifying key terms [scalars, vectors, displacement]. I use my Hue HD visualiser to model how to resolve. [see my other blog on how else I use my Hue HD https://sciencetltoolkit.wordpress.com/2018/01/16/top-10-ways-to-use-the-hue-hd-visualiser-in-the-science-lab-product-review/ ]

[30-50] students work independently on examples to consolidate learning. I then go through the answers with the students who self and peer mark their work.

[50-60] students stick graph work in their exercise books. I asked students to write a short paragraph to sum up their feelings and thoughts towards the topic and refer learning to their checklist. Jotting down hints and tips that they read in their revision in Y11.

I collected the gchallenge graphsraphs in as students left as an exit ticket – the photo shows some examples of the responses.

Analysis of the graphs suggests that the parallelogram of vector method home learning gave students ‘some’ challenge  as did the introduction of resolving vectors. The graphs all dipped during the summary aspect of the lesson. I look forward to doing this again.

Further reflection made me think about how often I would do this with each class and how much paper would be wasted. Our departmental printing bill is astronomical currently so I don’t think the business manager would be impressed.

Maybe I could give students 1 copy to stick in their book and they do it in pencil which could be rubbed out on a lesson by lesson basis.

Allow students to draw their own on a mini white board which can be scanned by the teacher and rubbed out.

I also thought about extending the graph [the scientist in me] to incorporate every lesson. This could be on a term basis and stuck in a students book. They plot their personal level of challenge after each lesson.

The template design can be downloaded from TES here:

https://www.tes.com/teaching-resource/stretch-and-challenge-graph-getting-the-level-of-challenge-right-11855189?theme=0

Thanks for reading,

Follow me on twitter and let me know how you will follow this up:


20 starter activities to stretch & challenge students

Stretch and challenge is one of latest buzz words in education. I see it as more than “gifted and talented” which focuses on the few. Stretch & Challenge is for all. Every student should be stretched and challenged, as basic differentiation regardless of ability.

Here are some examples of starters I have used:

  1. Curriculum Links: Allow your students to make links to all areas of the curriculum from the topic you are studying:IE: if you are covering atomic theory can you link aspects to the following. There could be an opportunity to award points [insert….school behaviour reward here]. More points could be awarded for harder to link to subjects:
English D+T Geography Art
Careers History Business Studies ICT
Food Tech PE Maths MFL

2.  Anagram Starter: Jumble up a keywords and key terminology for students to unjumble

ESCNIEC : Science

SGIHNLE: English

3. Retrieval Quizzes: After I watched present a keynote at a teachmeet I went away and reflected on improving my starters.to include the idea of retrieval practice http://www.learningscientists.org/blog/2016/6/23-1 I now attempt to give all my students 5 to 8 questions based on previous lessons, topics and even questions from previous years and sciences. I did these very simply as a list – a few months later I came across a much better student -friendly design by .retri

Download an example for FREE here

https://www.tes.com/teaching-resource/physics-retrieval-quiz-energy-waves-and-electricity-11814407

4. Odd one out: Give students 4 pictures and ask them to point out the odd one out and the reasons why?

5. What Dat Picture: have a photo on the board [as a hook…] and ask students what questions the picture brings to the surface and/or how it links to their work.

6.Scrabble/Pointless: Use the scrabble tiles for students to rearrange to create keywords and terms from topics, getting them to add the points together. Include Pointless into this if there is a word that only one student has written down.

scrabb


Science can add to this by creating words from the symbols of elements of the periodic table. Students can then add up the atomic masses.

Remember points win prizes

Template can be downloaded here: https://www.tes.com/teaching-resource/a-scrabble-and-pointless-game-starter-activity-11854487

7. Thunk: From independentthink.co.uk:

  1. Thunk is a beguilingly simple-looking question about everyday things that stops you in your tracks and helps you start to look at the world in a whole new light. discussion and debate

Such as:

  1. Should cyclists be fined for speeding?
  2. Where does the horizon start?
  3. If you had £500,000 what scientific research would you do?
  4. What colour is Physics?
  5. If you had £500,000 what scientific research would you do?

More examples can be found here:

8. Well Rounded: Give students a topic and let them explore it with helpful hints:

Who gains from it?

Who loses out?

What are the financial issues?

What are the unanswered questions and issues?

9. 6 degrees of separation: https://www.youtube.com/watch?v=TcxZSmzPw8kPick two random areas from topics (they can be different) and ask students to try and link them in 6 steps.

10. Reverse Questioning: Give students the answers to questions and get them to write the questions and/or calculations. If you are giving a number answer – then remember to include the units.

11. Strip Starters: Hand out to students as they enter the room and get them to stick in their books and answer the questions next to them. Another take on the retrieval quiz.

Find an example to download here: https://www.tes.com/teaching-resource/aqa-1-9-energy-starter-strip-11847566

12. Question Developer: Get students to write their own probing questions using these prompts

Ques

13. Who am I? This can be extended or shortened depending on the group. How did you get on with this one?

5 points: I was born on the 8th October 18503

4 points: I was born in Paris, France

3 points: My field of science was Chemistry

2 points: My research centred around changes in concentration, temperature & pressure

1 point: The principle named after me is used by chemists to predict the effect a changing condition has on a system in chemical equilibrium

Name: Henry Louis Le Chatelier

And some further watching:

Who is Le Chatelier? https://www.youtube.com/watch?v=XmgRRmxS3is

What is equilibrium? https://www.youtube.com/watch?v=dUMmoPdwBy4

14. Dingbats: use pictures to describe a saying or keyword.Any thoughts on this one?

Dingbat

Robert Hooke’s Law to find the Spring Constant

15. Code Breakers: Give students a topic and put the keywords in a code (IE A= 1 B =2) students then have to rearrange.

16. Quotes A: Give students related to a topic but put synonyms in place of the key terminology. Students then have to alter it.

17. Quotes B: Give students a piece of text but change some of the words and key terms. This could be grammar or incorrect information. Students need to correct them all.

18. What will you ask them? Show a photo of a famous person and ask students to write down questions they would want to ask them? IE what would you ask Charles Darwin?

19. What happens next? Show students a picture or a series of pictures and ask them what happens next? Encourage deeper thinking skills.

20. A to Z: A longer activity than a short engaging starter – but get students to find a keyword for a topic beginning with A to Z.


If you have any more ideas share them and let me know on twitter:


Image

Embedding Twitter in Learning – Celeb Tweets

Over the past couple of years I have seen plenty of examples of how to embed twitter into learning tasks and activities for students- much of this boils around the idea of an exit ticket or plenary. I try and reduce the amount of paper given out so have never been that keen on this. Great Resource templates can be found on TES by:

I used this template to create a resource that can be used to assess knowledge and in this case research. I asked students to research Marie Curie as part of the radioactivity unit from the GCSE AQA Physics spec. I then used the pre-made template and hints to allow the students to express some originality (which is difficult in Science at times) to think about what Marie Curie would have tweeted at certain times in her life.

twitter

Students reflected very positively to the activity even though very few of the students (Y9) has used or seen twitter.

The reaction was also very good on Twitter with many colleagues from all over the world commenting from a variety of subjects with lots of suggested ideas of how they plan to use it.

The template can be downloaded from TES for FREE using this link

Examples:

English: What would Lenny tweet to George in various points in Of Mice and Men

History: What would Henry 8 tweet to each of his wives?

MFL: Translate and Tweet

Art: How would (insert artist) tweet to explain his work

Please tweet me your ideas and comment to add yours


T&L Ideas Shared at S4S5, Science INSET day

As part of the programme of activities for colleagues attending S4S5 day in science,  we wanted to run a competition. Thank you for all organisations that donated a prize or two and thank you to all the colleagues that took part.

The competition designed by involved colleagues networking and talking to 5 different teachers from 5 different schools to collect and write down 5 teaching and learning ideas on a form. These forms were then put into a tombola and drawn during the closing keynote speeches and various prizes given out. Earlier in the day I ran a discussion on what we are doing in our departments for KS3 Science.

Below is an overview of the T&L ideas that colleagues suggested (I s4s1have attempted to order them):

Marking & Homework

  • Use homework booklets
  • Use a 1-20 marking grid template
  • Use a whole school HW booklet (1 subject = month so each subject would have about 3 a year)
  • Mark with code letters – No comments
  • Ready made codes – use highlighters
  • Use red, amber + green trays for students to put HW in for easy AFL
  • Use self and peer assessed HWs

Assessment and Revision

  • Use post it notes to write exam questions on – students have a snowball fight to answer
  • Put exam questions around room – students have 5 minutes per double page spread
  • Separate end of topic questions in PLC sections so students can identify strengths and weaknesses. Teacher can track intervention.
  • Use invisible key words
  • Use Socrative [app]
  • Prepared booklets for topics
  • Intervention groups to work with LSA/TA
  • Use mock data & compare to AQA data & then make up grade boundaries
  • Start “GCSE” from Y7
  • Levels Vs Words
  • Use A3 revision sheets then students add to it in small groups

Questioning

  • Have a question box for students to use to pose any science based questions. These can be used as a plenary.
  • Use ‘devise’ questions with triple scientists
  • “Virtual whiteboard” for recall
  • Students develop own questions for topics (Quiz, Quiz, Trade)
  • Here is the question what is the answer
  • Create higher order questions
  • Colour code lolly sticks for experiment extension – green state control variable and red evaluate etc.
  • Ignore the experts

Practical

  • Use lab books
  • Use food to model EG egg cell pizzas
  • Using jellyfish in acids and alkalis lesson
  • Olive oil condom
  • Reuben’s Tube
  • Use datalogger for momentum
  • Use a Frisbee when teaching momentum
  • STEM robots
  • Rainbow Fizz experiment
  • Cookie Mining (Quarrying)
  • Use Ipads to take pictures of learning moments for books
  • Different practicals in KS3 to GCSE
  • Use playdoh to create blood
  • Soap molecule bubbles – hydrophilic and hydrophobic

How Science Works

  • Plot straight to graphs and ignore tables
  • Move from describe to explain a graph
  • Look, cover, write & check equations
  • Students create own question from graphs using given command words to learn the difference between them

All other Teaching and Learning

  • Use I.D.E.A.L as plenary (Identify, Describe, Explain, Analyse/Apply, Link)
  • Kung Fu circuit symbols and Tai Chi graphs (Capra Physics)
  • Use Wordament [app] as a starter
  • Use Hexagon picture link to develop and consolidate ideas
  • Use masses in a box for a counterweight
  • Visual Imagery puzzles for engaging starters
  • Use specialist teachers from Year 7
  • Take part in I’m a Scientist Get Me Out of Here
  • Repetition to help retain
  • Use of virtual whiteboards
  • Use of Images as starters
  • STEM club to run over a half term instead of 1 a week
  • Space exploration [apps]
  • Get STEM contacts
  • Using cancer to help teach cell division
  • Using Doddle
  • Use Plickers [app] for instant feedback
  • Use Bristol/Bath university out reach (spectroscopy in a suitcase)
  • Mindfulness
  • Twitter – expert groups for lower sets
  • Don’t use textbooks


Interactive Foldable Periodic Table

I have been trying to create this resource for about 3 months – however all my other attempts were over complicated. Sometimes simple is better and more effective. At the time of writing I have not got much use of this, as I have already completed my periodic table topics however I think I will dig it out for revision etc.

The periodic is simple to use and put together the only downside is that the periodic table should replace the periodic tables given out in chemistry lessons mainly  due to the fact it is difficult to read the elements (the table has been modified from http://www.sci-borg.co.uk/chemistry-2.html)/ Students could still colour in selected groups/patterns/ions depending on the age group and need.

Suggested ways teachers can use  the table is that they add questions to the ‘flaps’ and students reply on the ‘base’ or the other way round. Students can also fill the spaces with facts related to the periodic table.

Some questions which could be used:

  • What do we call the elements of group 1/7/0?
  • Describe the reactivity in group 1/7/0?
  • Explain what group 1/7 have in common?
  • What are these metals called?
  • what are the properties of the transition metals/metals/non-metals?
  • What type of bonding……..?
  • The melting point…….
  • Density…………

The resource can be downloaded on my TES site – TRJ.

Enjoy the learning and teaching.

Recording the new GCSE Science required practical investigations.

Since the introduction of the new science GCSE specification the idea of scraping the ISA has interested me. The ISA (Individual Skills Assignment) from the AQA exam board, changed in recent years from one exam to two and so increased the amount of time that teachers spent on the preparation for it. I tried to do at least two ISAs for each science if I could, for each ISA lets say 6 hours (minimum) was spent on it – with 3 sciences, and 6 ISAs this would be a minimum of around 36 hours spent on the controlled assessment. We could know use that time to fill the gaps to enable more to progress. The difference between a grade boundary?

To replace this the system has introduced ‘required practical’s’ after much debate (and I could be wrong here) these are practical’s in Biology, Chemistry and Physics that the exam board could test students on in the exams HOWEVER there will be no direct checking from AQA that the practical’s have been taught but THEY DO need to be recorded. I believe (and this is just my guess) these would be more method based questions, analysis of secondary data and extended answer questions. The practical’s are not new, in fact I have taught them all  during the course of previous specifications nonetheless we now put more emphasis on them.

The question is how much extra work to teachers need to do and WHY? as Sinek claims there is no point in doing something if there is no ‘why’. The why is of course for the students benefit in reminding them of the practical’s closer to the exam, so do you..

  • just carry on as normal – just record in a markbook or spreadsheet
  • create a more formal document with the AT skills
  • create a working required practical booklet
  • get students to write practical’s up
  • ignore advice and wait until we know more.

My current plan of action is to get students to write up some of the practical’s and keeping them in a folder along with other assessments, checking their understanding of their method and mathematics.

I did write an AT skills booklet for each science for use within my  department however they remain unused and unwanted. If other teachers/departments can make use of them, please do so. They can be found on my TES page on a free download.


Top 10 pressure demos and videos for the new GCSE


Top 10 pressure demos and videos for the new GCSE

As I have started to teach the new AQA GCSE (2018) specification I thought I would share some of the demonstrations I have used to help explain the topics. As a non-specialist physics teacher, I felt the teacher specification could have explained what the students need to cover in more detai. I broke the spec down into various lessons. This series of lessons were taught with top set Y9 triple science, due to this reason I decided to use the true gas law names, these were not made explicit in the spec only the relationships. Some of the following may not be exactly true to the gas law however I believe they act as good models.

1)      What is pressure? Recap from KS3 (flipped learning/ H/W to watch this video), P=F/A. Modelling what is happening when we blow a balloon up?

2)      Enquiry into increasing depth, increasing pressure. Modelled with a displacement can with various holes in the side. Focussing on weight not density. Looking at dams and submarines and how they cope with intense pressure. Converting degrees Celsius to Kelvin.

3)      Summarising the two lessons above, embedding the idea of particles, energy, collisions and particles.  Video – Physics of diving

4)      Gay-Lussacs Pressure Law – Demos – candle on a plate of water, Egg in bottle, Boiling water with Ice, crushing can and give students data to graph and model

5)      Charles Law –Demos – putting balloon in ice and hot water , dented ping pong ball in hot water (can be done with a plastic water bottle as well)  model and then graph

6)      Boyles Law – demos – marshmallow in syringe or vacuum pump, make a Cartesian diver, balloon/lungs model model and graph


7)      Make sure graphs are correct with relationships clear. Get all students to explain what is happening to particles in each of the three gas laws, with diagrams. Work on the pV = constant. I will upload a #foldable I have created to support this.

8)      Use online assessment – plickers/quick-key/kahoot to assess learners and address any misconceptions.

This goes into far more depth than specification allows but should stretch and challenge triple scientists. I am also aware, pressure also appears in another area of the specification (forces) other than the particle model of matter. This section deals with the harder equations and understanding of atmospheric pressure and fluid pressure.

How have others approached this?

See my TES resources related to this here